Worried your beautiful book design will have ugly white edges? This common printing error happens when files aren’t set up right, ruining an otherwise perfect book.
Bleed is a small, extra margin of your design that extends beyond the page’s final trim size. It is absolutely essential because it gets trimmed off, guaranteeing your colors and images go to the very edge of the page. This prevents any unprofessional-looking white slivers after cutting.
This might sound like a technical detail, but it’s one of the most important steps in preparing a file for print. Getting it wrong can compromise your entire project. But don’t worry, it’s easy to get right once you understand the basics. Let’s break down exactly what bleed is, why it’s so critical, and how you can set it up perfectly for your next book.
What does bleed mean in book printing?
Are you confused by printing terms like "bleed" and "trim"? It sounds complicated, but the concept is very straightforward. Understanding it is the key to a flawless final product.
In book printing, "bleed" is the part of your artwork that extends beyond the final cut edge of the page. This extra area is printed and then cut off, ensuring that your background colors or images cover the page completely without leaving white borders.

The Three Key Zones
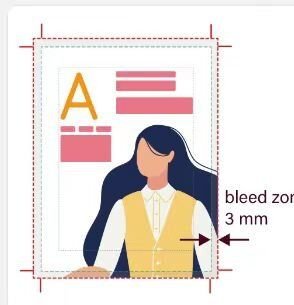
To truly grasp bleed, you need to understand the three areas on your design page. I always explain this to new designers I work with because it forms the foundation of good print design. These zones dictate where to place your content safely.
| Zone | Definition | Purpose |
|---|---|---|
| Safe Area | The inner margin of your page. | All your important text and images should stay inside this area to ensure they are not accidentally trimmed off. |
| Trim Line | The final size of the page. | This is the line where the printer will cut the paper. |
| Bleed Area | The outermost area, usually 3mm. | Any background image or color that you want to reach the edge of the page must extend all the way to this line. |
It’s Not Just an ‘Extra’ Margin
The bleed area isn’t just for decoration; it’s a technical necessity. Printing presses and cutting machines are incredibly precise, but when you’re cutting a stack of hundreds or thousands of sheets of paper at once, tiny shifts—fractions of a millimeter—are inevitable. This is called mechanical tolerance. Bleed is your design’s insurance policy against these tiny shifts, making sure the final result is exactly what you envisioned.
Why is bleed important in printing?
Thinking you can get away without adding bleed? This small shortcut can lead to big disappointments. Your beautiful, full-page artwork could end up looking cheap and poorly planned.
Bleed is vital because it compensates for minor mechanical shifts during the paper trimming process. It acts as a buffer, ensuring your design appears seamless and professional even if the cut isn’t 100% perfect, thus preventing any ugly white lines at the edge.

The Reality of Paper Trimming
After your book pages are printed, they are stacked high and trimmed to their final size using a large industrial guillotine. While our machines at Huaxin Printing are state-of-the-art, the physics of cutting a thick stack of paper means there can be minuscule variations from the top sheet to the bottom one. This isn’t a flaw; it’s a physical reality of the process.
If your design stops exactly at the trim line, even a 0.5mm shift in the cut can expose the unprinted white edge of the paper. This immediately cheapens the look of the book and signals an amateur production job. As someone who has been around paper and ink my whole life, I can spot it from a mile away.
Bleed as Your Quality Insurance
I always tell my clients to think of bleed as their project’s quality insurance. One of my long-term clients, Stephanie, a very sharp Print Production Director in the US, learned this lesson early on. For her first project, her designer didn’t add bleed, thinking their measurements were precise enough. I had to explain that no matter how advanced our equipment is, we need that bleed to guarantee a perfect edge. We helped her team correct the files, and the final books were stunning. It’s a small step that protects the integrity and professionalism of the final product.
How much bleed should I have for printing?
Unsure how much bleed to add to your document? Getting this value wrong can cause problems. Too little won’t be effective, and too much might be unnecessary.
The industry standard for most print products, including paperback books, is 3mm (or 0.125 inches) of bleed on every side. However, this can change depending on the product, like a hardcover case. It is always best to confirm the exact requirement with your printer.
The 3mm Standard Rule
Why 3mm? This measurement has become the global standard because it provides enough of a margin to absorb the typical, minor variations in the trimming process without being excessive. It gives the cutting machine operator enough room for error to produce a clean, edge-to-edge result consistently. Anything less than 3mm (or 0.125") is risky, as even a small shift could expose a white line. At my family’s company, Huaxin Printing, we recommend 3mm for all standard book projects.
When You Might Need More
While 3mm is a great general rule, some products require a much larger bleed because of their construction.
| Product Type | Recommended Bleed | Why it’s Different |
|---|---|---|
| Paperback Books | 3mm (0.125") | Standard for single sheets being trimmed in a stack. |
| Hardcover Cases | 15mm (0.625") | This extra material isn’t trimmed off but is wrapped around the thick greyboard and glued down on the inside. |
| Dust Jackets | 5mm – 10mm | The larger bleed accommodates both trimming and the complex folding required for the flaps. |
The most important takeaway is to never assume. Before you or your designer even begin the layout, ask your printing partner for their technical specifications. A good printer will provide clear guidelines or even templates, taking all the guesswork out of the equation.
How do you add bleed lines in Adobe?
Ready to apply this knowledge but not sure where the setting is? It’s a simple step in most design programs, but it’s easy to miss if you don’t know where to look.
In Adobe InDesign or Illustrator, you set the bleed when creating a new document in the "Bleed and Slug" section. Simply enter "3 mm" or "0.125 in" for all sides. This creates a red guide around your page that you must extend your background artwork to.

Setting Up Bleed in InDesign
InDesign is the industry standard for book layout, and setting up bleed is part of the initial document setup.
- When you go to File > New > Document, a dialog box appears.
- Look for the Bleed and Slug dropdown menu (it’s often collapsed by default).
- In the four boxes for bleed (Top, Bottom, Inside, and Outside), enter 3 mm or 0.125 in. If the chain icon is linked, you only need to enter the value once.
- Click Create. You will now see your page with a black line representing the trim edge and a red line outside of it. The red line is your bleed guide.
- When designing, make sure any image or color block you want at the page’s edge extends all the way to touch this red line.
Exporting Your File Correctly
Setting up the bleed is only half the battle. You must also ensure that the bleed information is included in the final PDF you send to your printer. This is a final check I always drill into my team.
When you export your file (File > Export and choose Adobe PDF (Print)), go to the Marks and Bleeds tab on the left. In this section, you must check the box that says Use Document Bleed Settings. If you forget this step, the final PDF will be created without the bleed area, and all your setup work will be for nothing.
Conclusion
Adding bleed to your print files is a small, simple step that makes a huge difference. By including a 3mm margin, you ensure a professional, edge-to-edge finish for your book.