Introduction
Have you ever printed a beautiful image, only to be disappointed when the colors on paper look nothing like they did on your screen? You’re not alone! Many people find themselves confused by this common issue. Color variations can be quite perplexing, especially for artists, photographers, and anyone who relies on accurate color reproductions.
Did you know that screens use a different color model than printers? Screens display colors using RGB (Red, Green, Blue), while printers utilize CMYK (Cyan, Magenta, Yellow, Black). This fundamental difference is just the tip of the iceberg when it comes to understanding color discrepancies. In this article, we’ll dive deep into the reasons why these variations occur. We’ll explore color management, calibration, and practical steps you can take to ensure that your prints match your screen as closely as possible.
At Huaxin Printing, we strive to deliver high-quality printed products that resonate with your artistic vision. With our commitment to color accuracy and expert technology, you can trust us to help you bring your projects to life.
Understanding Color Models
RGB vs. CMYK
To grasp why your prints may differ from what you see on your screen, it’s vital to understand the two primary color models: RGB and CMYK.
| Color Model | Used For | Components | Description |
|---|---|---|---|
| RGB | Screens | Red, Green, Blue | An additive color model that combines light to create colors. When these three colors are combined in various intensities, they create all other colors seen on digital displays, including white when combined fully. |
| CMYK | Printing | Cyan, Magenta, Yellow, Black | A subtractive color model that uses inks to produce colors on paper. In this model, the colors we see are created by subtracting light through the absorption of inks. When no ink is applied, you see white; applying all colors absorbs all light, creating black. |
Understanding RGB
The RGB model is based on light itself. When light from the red, green, and blue elements combines, they create various colors. For example:
- Red + Green = Yellow
- Red + Blue = Magenta
- Green + Blue = Cyan
In digital workspaces, this model allows for vibrant and glowing colors, explaining why images viewed on screens often look superbly bright and detailed.
Understanding CMYK
In contrast, the CMYK model represents a different approach. This model uses inks to absorb varying wavelengths of light:
- Cyan absorbs red light.
- Magenta absorbs green light.
- Yellow absorbs blue light.
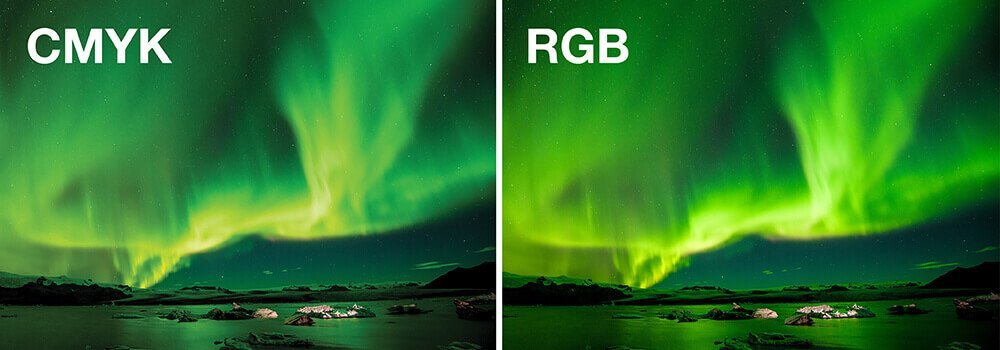
When combined, these inks can produce a wide range of colors, but not all colors found in the RGB spectrum can be accurately reproduced in CMYK. For instance, some vibrant colors, particularly bright greens and blues, may appear duller when printed.
Color Gamut
Another key factor to consider is the color gamut. Color gamut refers to the range of colors that a particular device, like a monitor or printer, can produce.
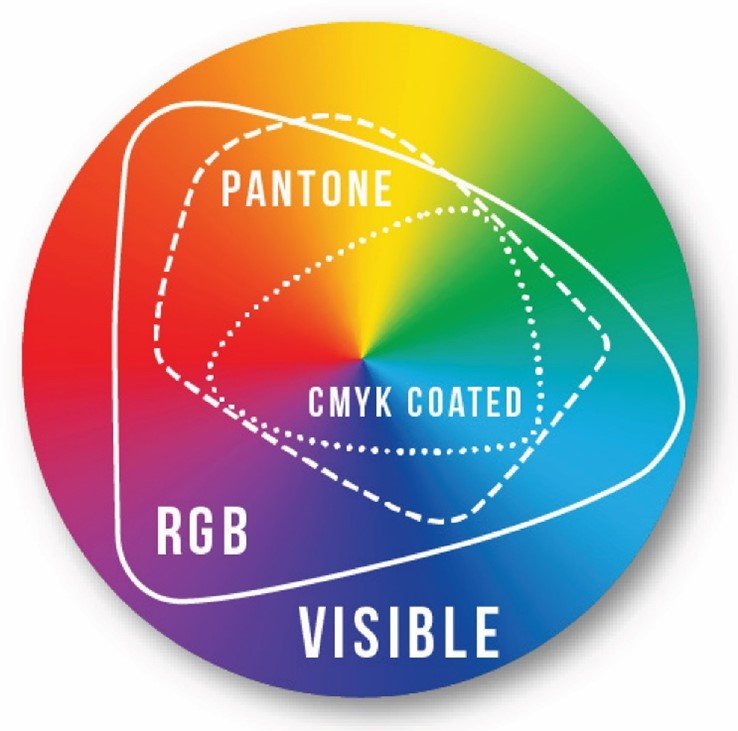
- Wider Gamut: High-quality screens can display a broader range of colors compared to most printers. This discrepancy often means that even if an image looks stunning on a screen, the printer may not recreate all those lush colors.
- Gamut Clipping: When a color on the screen is out of the printer’s gamut, it gets “clipped,” resulting in a different shade or color being printed instead. This is one reason why prints can appear duller or tinted differently compared to their digital counterparts.
| Device | Color Gamut |
|---|---|
| High-Quality Monitor | Can display over 16.7 million colors (sRGB and Adobe RGB coverage) |
| Standard Printer | Typically prints around 8,000 colors (varies based on the CMYK inks) |
The chart above illustrates the significant difference in color capability between devices. For precise print results, it’s crucial to know the associated color gamuts as you work on digital graphics.
The Role of Calibration
Why Calibration Matters
Calibration is the process of adjusting your devices to ensure that they display colors consistently and accurately. Without proper calibration, your monitor may not represent colors accurately, leading to misleading results when you print.
Imagine this: You’ve spent hours adjusting an image on your monitor, getting the colors just right. However, if your monitor isn’t calibrated, the colors may not be true to life. This could result in frustration when you see your prints looking different.
Regular calibration ensures:
- Your monitor displays colors accurately,
- The printer produces colors consistent with what you see on the screen.
Tools for Calibration
There are several ways to calibrate your devices effectively:
Hardware Calibration Tools
- Colorimeters:
- SpyderX Pro: Designed for photographers and designers, this tool automatically calibrates your display for accurate colors. It uses advanced technology to adjust your monitor based on your specific lighting conditions.
- X-Rite i1Display Pro: This is a top-tier calibration solution that offers professional-grade calibration for both monitors and laptops. It gives precise results for various lighting environments.
- Spectrophotometers:
- X-Rite i1Photo Studio: This tool is perfect for photographers who need consistent color across their workflow, featuring tools to help with both monitor and printer calibration.
Software Calibration Tools
- Built-in Operating System Tools: Both Windows and macOS come with built-in Calibration tools that guide users through the calibration process.
- Windows: The Display Color Calibration tool lets you adjust gamma, brightness, contrast, and color balance to suit your needs.
- macOS: Apple’s ColorSync Utility provides a smooth calibration process, allowing you to select calibration settings for your display.
Calibration Schedule
| Device | Recommended Calibration Frequency |
|---|---|
| Monitor | Every month |
| Printer | Every time you change paper type |
Calibrating your devices may seem tedious, but doing it regularly will save you a lot of time and effort in the long run by ensuring that what you see on your screen translates accurately to paper.
Printer Settings and Paper Choice
Choosing the Right Paper
The type of paper you select for printing can significantly impact your print’s color quality. Different papers absorb ink differently, affecting the final appearance of colors. You could get more detailed information about how paper affect the printing colors by clicking here.
| Paper Type | Characteristics | Best For |
|---|---|---|
| Glossy Paper | Produces vibrant colors and a shiny finish | High-quality photos |
| Matte Paper | Softer appearance and less glare | Art prints and presentations |
| Fine Art Paper | Textured surface, absorbs ink well | Fine art reproductions |
| Photo Paper | Designed specifically for photographs | Photographic prints |
Printer Profiles
Using the correct printer profile is essential for achieving color accuracy. A printer profile is a set of data that describes how a particular printer reflects color under certain conditions.
How to Set Up Printer Profiles
- Check Printer Specifications:
- Identify the printer model and understand its color capabilities; it will guide you in selecting the right profiles.
- Download Profiles:
- Visit the manufacturer’s website to download the latest ICC profiles specific to your model. These profiles are often available for different paper types and color settings.
- Install Printer Profiles:
- On Windows:
- Go to Control Panel > Color Management > Devices.
- Add the downloaded ICC profile and set it to be the default for your printer.
- On macOS:
- Open System Preferences > Printers & Scanners. Select your printer, and under the Options & Supplies menu, go to the Drivers tab to add the ICC profile.
- On Windows:
- Using Software for Printing:
- When printing, ensure to select the correct paper type in your print settings, and choose “Adobe RGB,” “sRGB,” or the ICC profile you installed.
- Soft Proofing:
- Use software like Adobe Photoshop or Lightroom to soft proof. This feature lets you see how an image will look when printed based on the printer profile and paper type selected, allowing fine-tuning for optimal results.
Implementing the right paper types and printer profiles can elevate the quality of your prints and closely match what you see on your screen.
Lighting Conditions
Impact of Lighting on Perception
The lighting conditions in which you view your prints can drastically influence how colors appear.
- Artificial Lighting: Viewing prints in harsh fluorescent light may cause colors to appear differently than in soft, natural light. This is because artificial lighting can cast color tones that interact with the print, distorting the perceived color.
- Optimal Viewing Conditions: It’s best to inspect prints in soft, diffused natural lighting to get an accurate sense of how they will look in real-world settings.
Best Practices for Viewing Prints
To ensure you’re getting an accurate perception of your printed materials:
- Choose the Right Space: Find an area with balanced, soft lighting to evaluate your prints. Avoid direct sunlight.
- Use a Light Box: For absolute accuracy, consider using a light box that provides constant lighting conditions. This reduces variability due to external light sources.
Visual Comparison
Imagine two scenarios to illustrate the impact of lighting on prints:
| Lighting Condition | Appearance |
|---|---|
| Harsh Fluorescent Light | Prints appear dull and colors seem off |
| Soft Natural Light | Colors appear vibrant and true to life |
By taking care of your viewing environment, you can have a more genuine assessment of how colors translate from screen to print.
Common Problems and Solutions
Banding and Dithering
Banding refers to visible stripes of color appearing on your prints, while dithering is a technique used to create a smooth gradual transition between colors. Both issues can arise from inadequate printer settings or low-quality images.
Solutions:
- Adjust Print Quality Settings: Experiment with higher print quality options in your printer software settings.
- Use High-Resolution Images: Ensure the images you print are of sufficient resolution to reduce banding.
Adjusting Brightness and Contrast
Adjusting brightness and contrast within your editing software is an essential step before printing.
- Why This Matters: Screens often exhibit a more vibrant range of colors due to their backlighting. If you don’t tweak these settings, your prints might appear darker or duller.
- Make a Test Print: Before completing a large batch print, do a test print to see how the colors come out. This allows you to make necessary adjustments before final prints.
You can avoid common problems by paying attention to these details and adjusting your processes accordingly.
Conclusion
Understanding why prints look different from what you see on the screen is crucial for achieving high-quality results. By focusing on key factors such as color models, calibration, paper choice, lighting conditions, and potential printing problems, you can significantly improve your printing experience.
At Huaxin Printing, we pride ourselves on our ability to deliver beautiful printed materials that align with your vision. When you’re ready to print, trust us to bring your ideas to life with stunning color accuracy and clarity.
If you are experiencing any issues with prints or would like to discuss your next project, do not hesitate to contact us or request a quote—your satisfaction is our top priority!
Frequently Asked Questions (FAQs)
Why do printers use CMYK instead of RGB?
Printers use CMYK because printing is a subtractive process. In contrast, RGB is additive, combining light to create colors on screens. CMYK allows printers to accurately reproduce images using ink.
How often should I calibrate my monitor and printer?
It’s advisable to calibrate your monitor every month and your printer whenever you change the type of paper or ink. Regular calibration helps maintain color accuracy.
What is color management software, and do I need it?
Color management software helps ensure that colors appear consistent across different devices. While not absolutely necessary, using it will enhance the accuracy of your prints.
Can I fix the color discrepancies after printing?
While you cannot change the printed material after it’s done, you can learn from your previous prints to adjust your processes for future projects, ensuring better results.
What are some signs of a low-quality print?
Common signs of low-quality prints include graininess, banding, dull colors, or incorrect color reproduction. If you notice these issues, consider adjusting your settings or using higher quality materials.